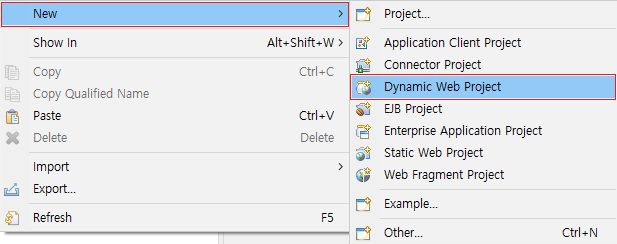
Dynamic Web Project로 스프링 프로젝트 생성하기
Dynamic Web Project 생성한다.
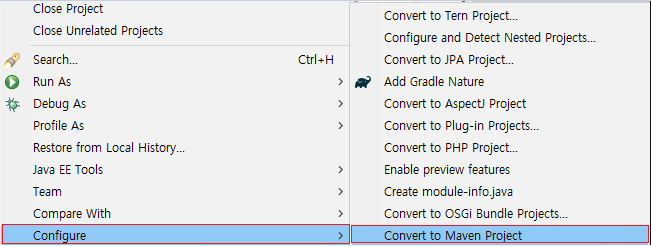
Configure → Convert to Maven Project 생성한다.
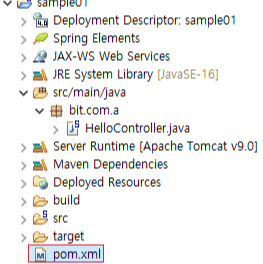
pom.xml파일이 생성된다.
pom.xml에 Spring Web MVC 라이브러리 추가하기
https://mvnrepository.com/artifact/org.springframework/spring-webmvc/5.3.6
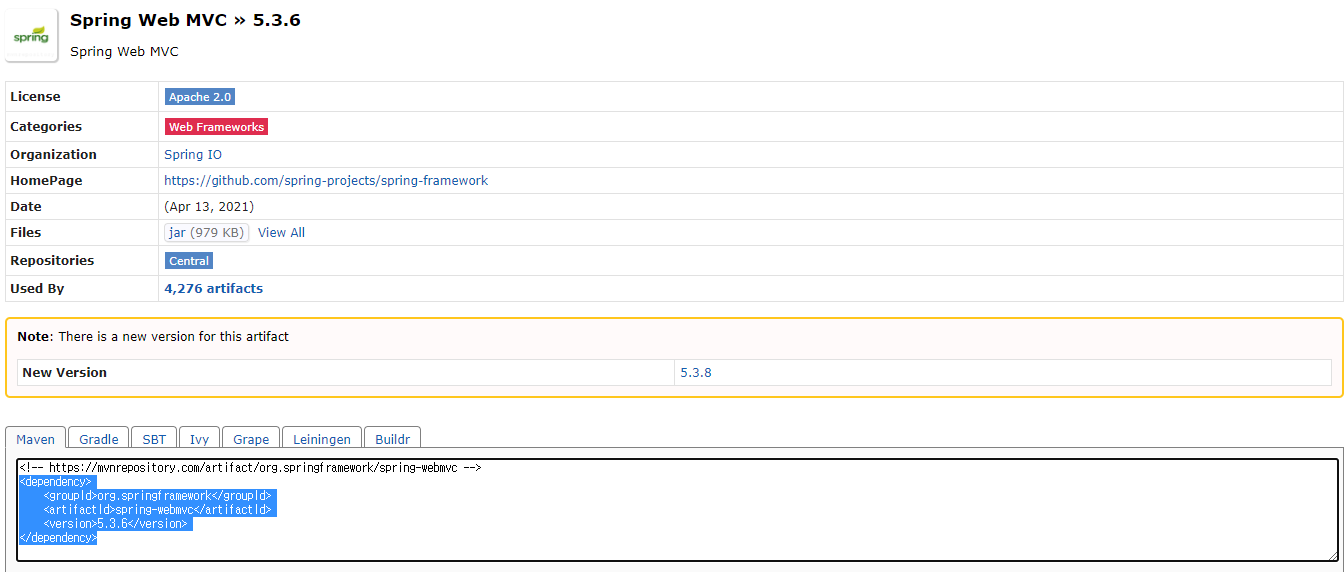
드래그 부분 복사해서 pom.xml의 <dependencies> tag안에 넣어준다.
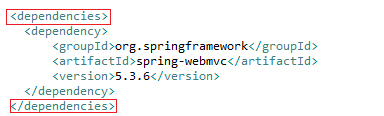
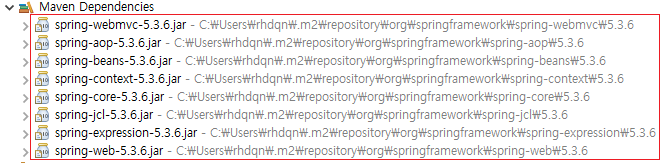
위 코드를 넣으면 알아서 jar파일을 다운로드 해준다 (설정파일)
pom.xml 예시
<project xmlns="http://maven.apache.org/POM/4.0.0" xmlns:xsi="http://www.w3.org/2001/XMLSchema-instance" xsi:schemaLocation="http://maven.apache.org/POM/4.0.0 https://maven.apache.org/xsd/maven-4.0.0.xsd">
  <modelVersion>4.0.0</modelVersion>
  <groupId>sample01</groupId>
  <artifactId>sample01</artifactId>
  <version>0.0.1-SNAPSHOT</version>
  <packaging>war</packaging>
  <build>
    <plugins>
      <plugin>
        <artifactId>maven-compiler-plugin</artifactId>
        <version>3.8.1</version>
        <configuration>
          <release>16</release>
        </configuration>
      </plugin>
      <plugin>
        <artifactId>maven-war-plugin</artifactId>
        <version>3.2.3</version>
      </plugin>
    </plugins>
  </build>

  <dependencies>
  	<dependency>
    	<groupId>org.springframework</groupId>
    	<artifactId>spring-webmvc</artifactId>
    	<version>5.3.6</version>
	</dependency>
  </dependencies>

</project>
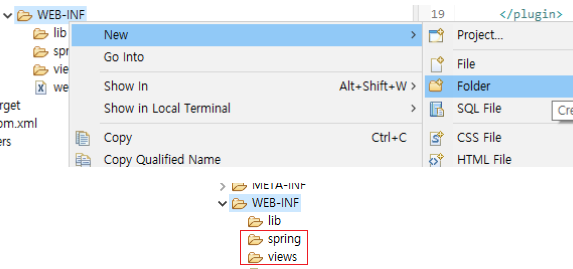
WEB_INF 폴더를 추가한다.(spring, views)
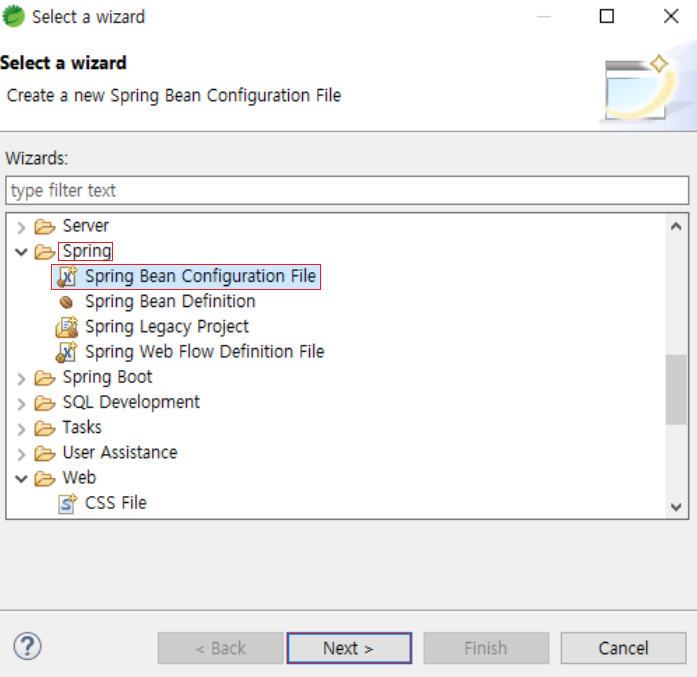
dispatcherServlet.xml 생성하기
spring 폴더안에 Spring Bean Configuration File을 생성한다.
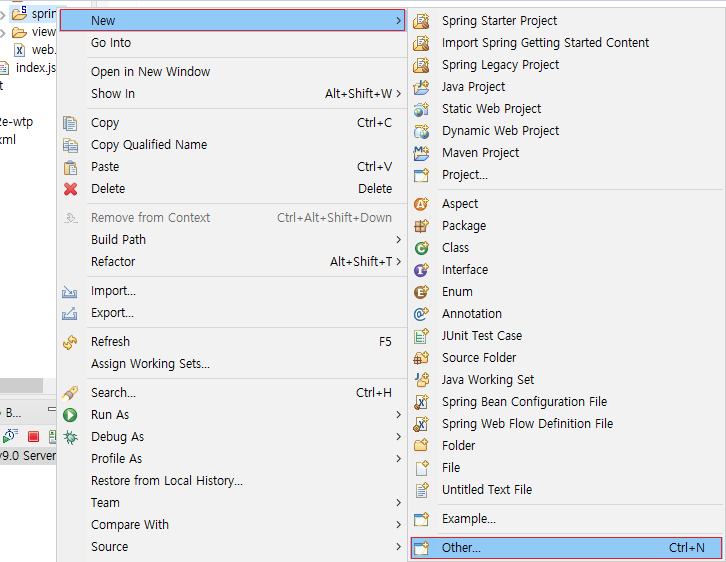
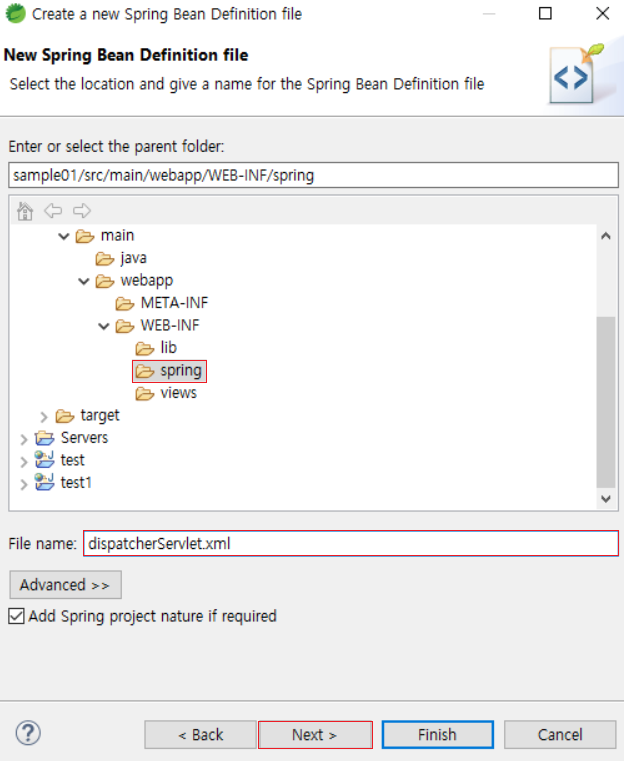
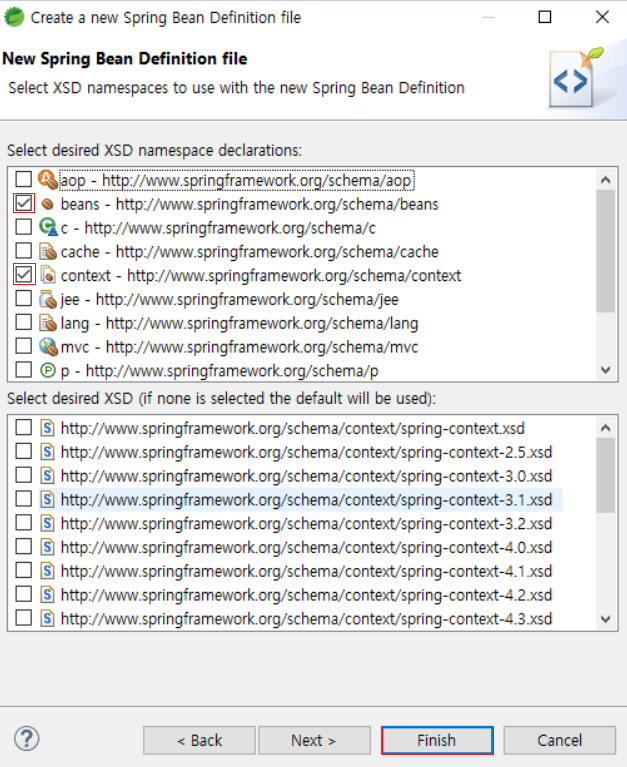
name 지정 후 Next> Beans와 context 체크한다.
dispatcherServlet.xml 예시
<?xml version="1.0" encoding="UTF-8"?>
<beans xmlns="http://www.springframework.org/schema/beans"
	xmlns:xsi="http://www.w3.org/2001/XMLSchema-instance"
	xmlns:context="http://www.springframework.org/schema/context"
	xsi:schemaLocation="http://www.springframework.org/schema/beans http://www.springframework.org/schema/beans/spring-beans.xsd
		http://www.springframework.org/schema/context http://www.springframework.org/schema/context/spring-context-4.3.xsd">

	<!-- spring MVC annotation(주석문, 지시문)을 사용하기 위한 설정 -->
	<context:annotation-config />

	<!-- bean 객체를 생성할 때 사용
	 	 장점 : XML에서 바로 객체를 생성하면 singleton이 필요 없어진다.
		 사용자의 view의 위치, 확장자명 설정 -->
	<bean id="viewResolver" class="org.springframework.web.servlet.view.InternalResourceViewResolver">
		<!-- property : class의 내부 변수  -->
		<!-- prefix : views의 경로 설정 -->
		<property name="prefix" value="/WEB-INF/views/"></property>
		<!-- suffix : 사용할 확장자 설정 -->
		<property name="suffix" value=".jsp"></property>
	</bean>

	<!-- base-package : 스프링에서 사용할 공통 패키지 설정 -->
	<context:component-scan base-package="bit.com.a"></context:component-scan>

</beans>
Web.xml 파일을 생성한다.

Web.xml 예시
<?xml version="1.0" encoding="UTF-8"?>
<web-app xmlns:xsi="http://www.w3.org/2001/XMLSchema-instance" xmlns="http://xmlns.jcp.org/xml/ns/javaee" xsi:schemaLocation="http://xmlns.jcp.org/xml/ns/javaee http://xmlns.jcp.org/xml/ns/javaee/web-app_4_0.xsd" version="4.0">
  <display-name>sample01</display-name>
  <welcome-file-list>
    <welcome-file>index.html</welcome-file>
    <welcome-file>index.htm</welcome-file>
    <welcome-file>index.jsp</welcome-file>
    <welcome-file>default.html</welcome-file>
    <welcome-file>default.htm</welcome-file>
    <welcome-file>default.jsp</welcome-file>
  </welcome-file-list>

  <servlet>
  	<servlet-name>dispatcherServlet</servlet-name>
  	<servlet-class>
  		<!-- 맨 처음 서블릿을 알려주는 코드 -->
  		org.springframework.web.servlet.DispatcherServlet
  	</servlet-class>

  	<init-param>
  		<param-name>contextConfigLocation</param-name>
  		<param-value>
  			/WEB-INF/spring/dispatcherServlet.xml
  		</param-value>
  	</init-param>

  	<!-- load-on-startup 1 : 제일 첫번째로 가야할 XML이다 설정, 여기부터 시작해라 -->
  	<load-on-startup>1</load-on-startup>

  </servlet>

  <servlet-mapping>
  	<servlet-name>dispatcherServlet</servlet-name>
  	<url-pattern>/</url-pattern>
  </servlet-mapping>

  <!-- 한글설정하기
  		jsp파일에서 setcharacterEncoding을 안해주어도 된다.
   -->
  <filter>
  	<filter-name>encodingFilter</filter-name>
  	<filter-class>
  		org.springframework.web.filter.CharacterEncodingFilter
  	</filter-class>

  	<init-param>
  		<param-name>encoding</param-name>
  		<param-value>UTF-8</param-value>
  	</init-param>

  	<!-- forceEncoding : 강하게 설정 -->
  	<init-param>
  		<param-name>forceEncoding</param-name>
  		<param-value>true</param-value>
  	</init-param>

  </filter>

  <filter-mapping>
  	<filter-name>encodingFilter</filter-name>
  	<url-pattern>/*</url-pattern>
  </filter-mapping>
</web-app>
java 예시
package bit.com.a;

import org.springframework.stereotype.Controller;
import org.springframework.web.bind.annotation.RequestMapping;

@Controller		// annotation
public class HelloController {

	@RequestMapping("hello")
	public String helloMethod() { // 컨드롤러에 왔니 ?
		System.out.println("HelloController helloMethod()");

		return "hello";		// hello.jsp로 가라!
	}

}
views폴더에 hello.jsp 파일을 생성한다.
<%@ page language="java" contentType="text/html; charset=UTF-8"
    pageEncoding="UTF-8"%>
<!DOCTYPE html>
<html>
<head>
<meta charset="UTF-8">
<title>Insert title here</title>
</head>
<body>
<h1>hello.jsp</h1>
</body>
</html>
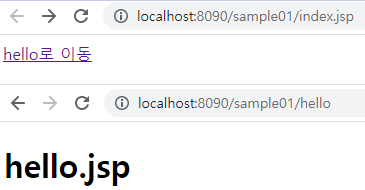
webapp폴더에 index.jsp파일을 생성한다.
<%@ page language="java" contentType="text/html; charset=UTF-8"
    pageEncoding="UTF-8"%>
<!DOCTYPE html>
<html>
<head>
<meta charset="UTF-8">
<title>Insert title here</title>
</head>
<body>

<a href="hello">hello로 이동</a>
</body>
</html>
실행화면
'IT > Spring' 카테고리의 다른 글
| [Spring] @PathVariable 과 @RequestParam 이란? (0) | 2021.11.30 |
|---|---|
| [Spring Boot + Security] SecurityConfig 설정 (Feat. gradle) (1) | 2021.11.30 |
| [Spring] 의존성 관리방법(Dependency Injection- Setter Injection/Constructor Injection) (0) | 2021.07.18 |
| [Spring] Spring Bean Configuration File의 beans, bean속성과 속성값 이해하기 (0) | 2021.07.18 |
| [Spring] AOP (Log 사용예시) (0) | 2021.07.14 |